The Complete Hiking Guide to the Nakahechi Route of Japan’s Kumano Kodo
Setting out to hike the Nakahechi route of the Kumano Kodo? Then listen up!
First, you’re in luck, and second, I’m happy you’ve found my guide! I’ve just completed the Kumano Nakahechi trail on a 5-day hike from Takijiri-oji to Nachi Taisha, and have tons of notes to share. 📝
Before we get into the good stuff, please note there are several routes of the Kumano Kodo Pilgrimage, but the Nakahechi route is the classic trail that crosses the Kii Peninsula from west to southeast, and is the route most tourists will want to hike for convenience and payoff.
It’s called the “Imperial Route,” after its ties to Japan’s ancient capital cities of Nara and Kyoto, and to the pilgrims, emperors, and imperial family who crossed these same arduous mountain passes over the last 1,000 years.
The Nakahechi offers a challenging yet manageable multi-day trail crossing mountainous villages into scenic viewpoints and valleys, past historic onsen baths and Oji statues, and connects to all three of the Kumano Grand Shrines ⛩️ (known as the “Kumano Sanzan”):
- Kumano Hongu Taisha (considered the spiritual heart of the Kumano),
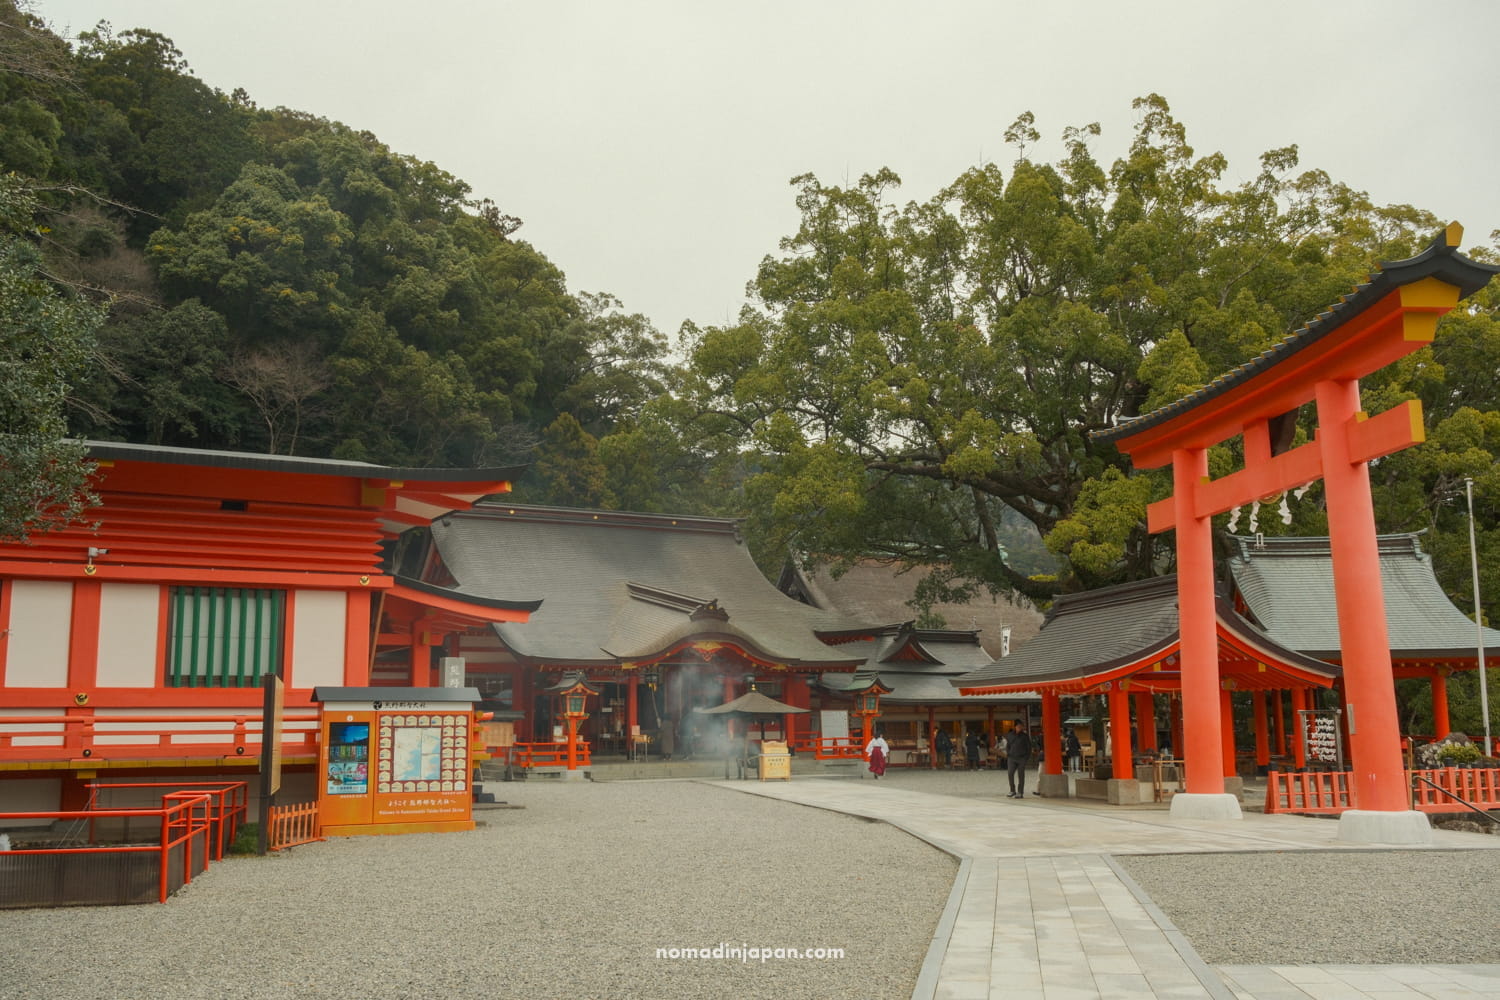
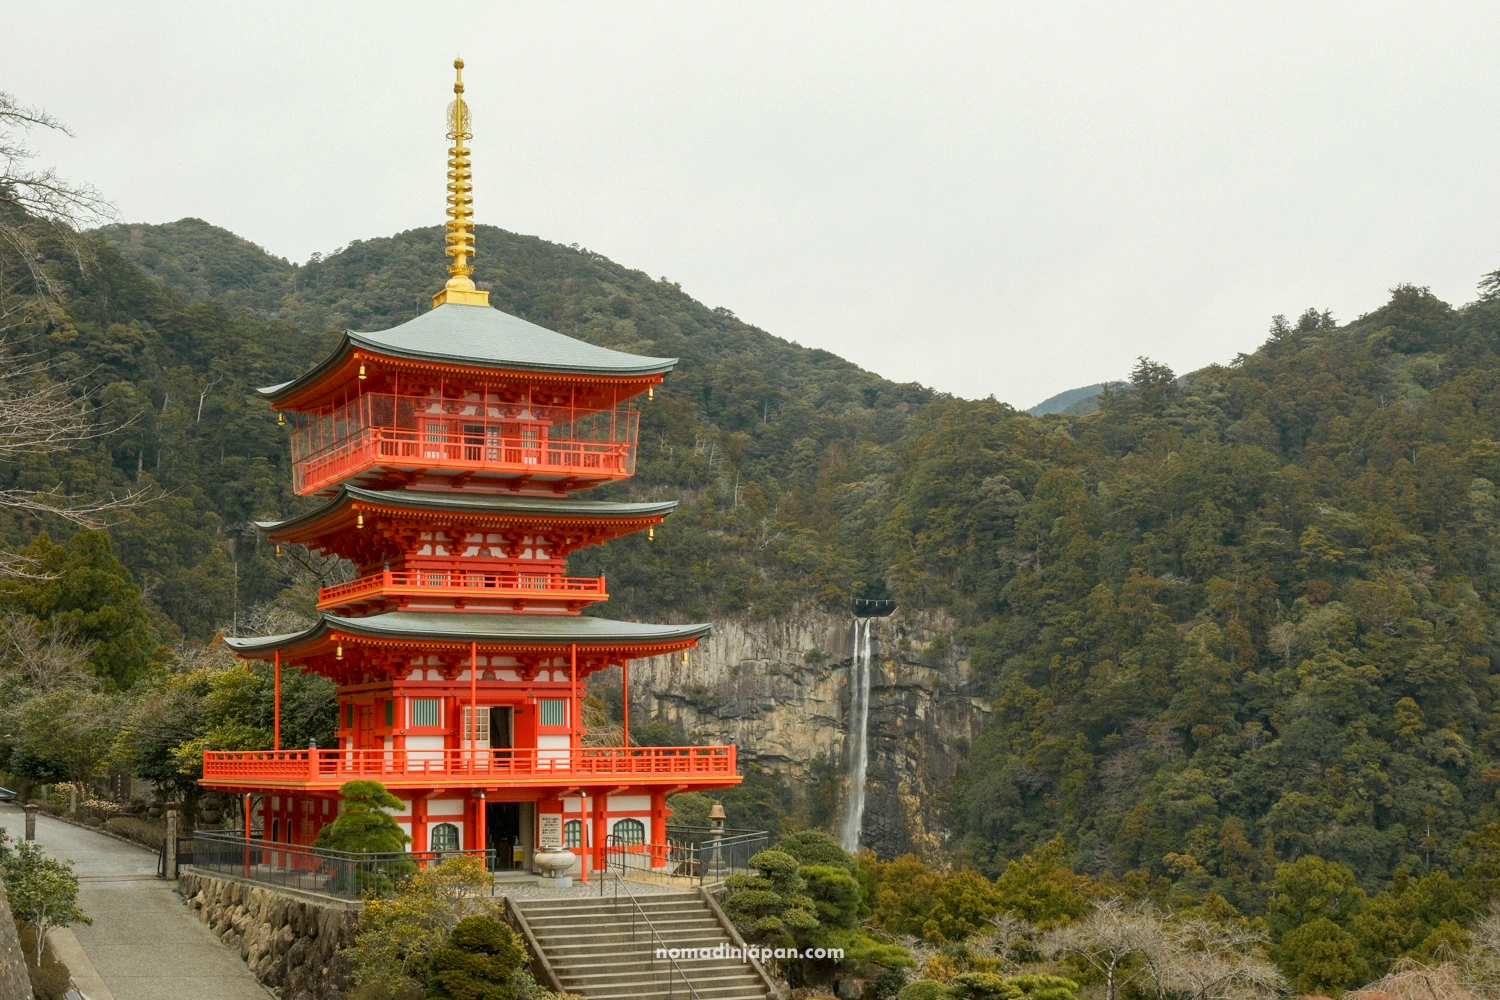
- Kumano Nachi Taisha (the shrine with the pagoda and waterfall in the background),
- and Kumano Hayatama Taisha (in Shingu City, near the coast — reachable only by boat or bus).


I’m glad we chose the Nakahechi route as beginners to the Kumano Kodo! You can start at the Nakahechi trailhead in Takijiri-oji and use a mix of buses and hiking to shorten your itinerary before/after you reach Kumano Hongu Taisha.
This Nakahechi trail guide is based on our experience hiking ~70 km (43.5 mi) over 5 days, with an overnight in Nachi-Katsuura for post-hike relaxation and time to collect our last stamp at the Kumano Hayatama Taisha Shrine in nearby Shingu (reachable by bus).
In this guide, I’m going to detail our day-by-day stats after trekking the full Nakahechi route, starting at Takijiri-oji (trailhead) and ending at Kumano Nachi Taisha, with Nachi Falls as the dramatic, rewarding cherry on top of a challenging, multi-day hike.
Here’s everything you need to know to plan and prep for hiking the Nakahechi.
If you have any leftover questions, please drop them in the comments after this post!
Our Nakahechi Route Itinerary (Day-by-Day Breakdown)
Before I get into the daily itinerary, here’s a quick overview of what you need to know to make your planning and logistics (and reading this guide!) a tad easier.
🏡 Booking ryokan/guesthouses:
I reserved everything through Booking.com and pieced together all of our accommodation myself. I detail more in my guide on where to stay on the Kumano Kodo; however, for quick reference, we stayed in these villages/towns (in order): Takahara, Chikatsuyu, Yunomine Onsen, Koguchi, and Nachi-Katsuura (optional).
💮 Collecting Kumano pilgrimage stamps:
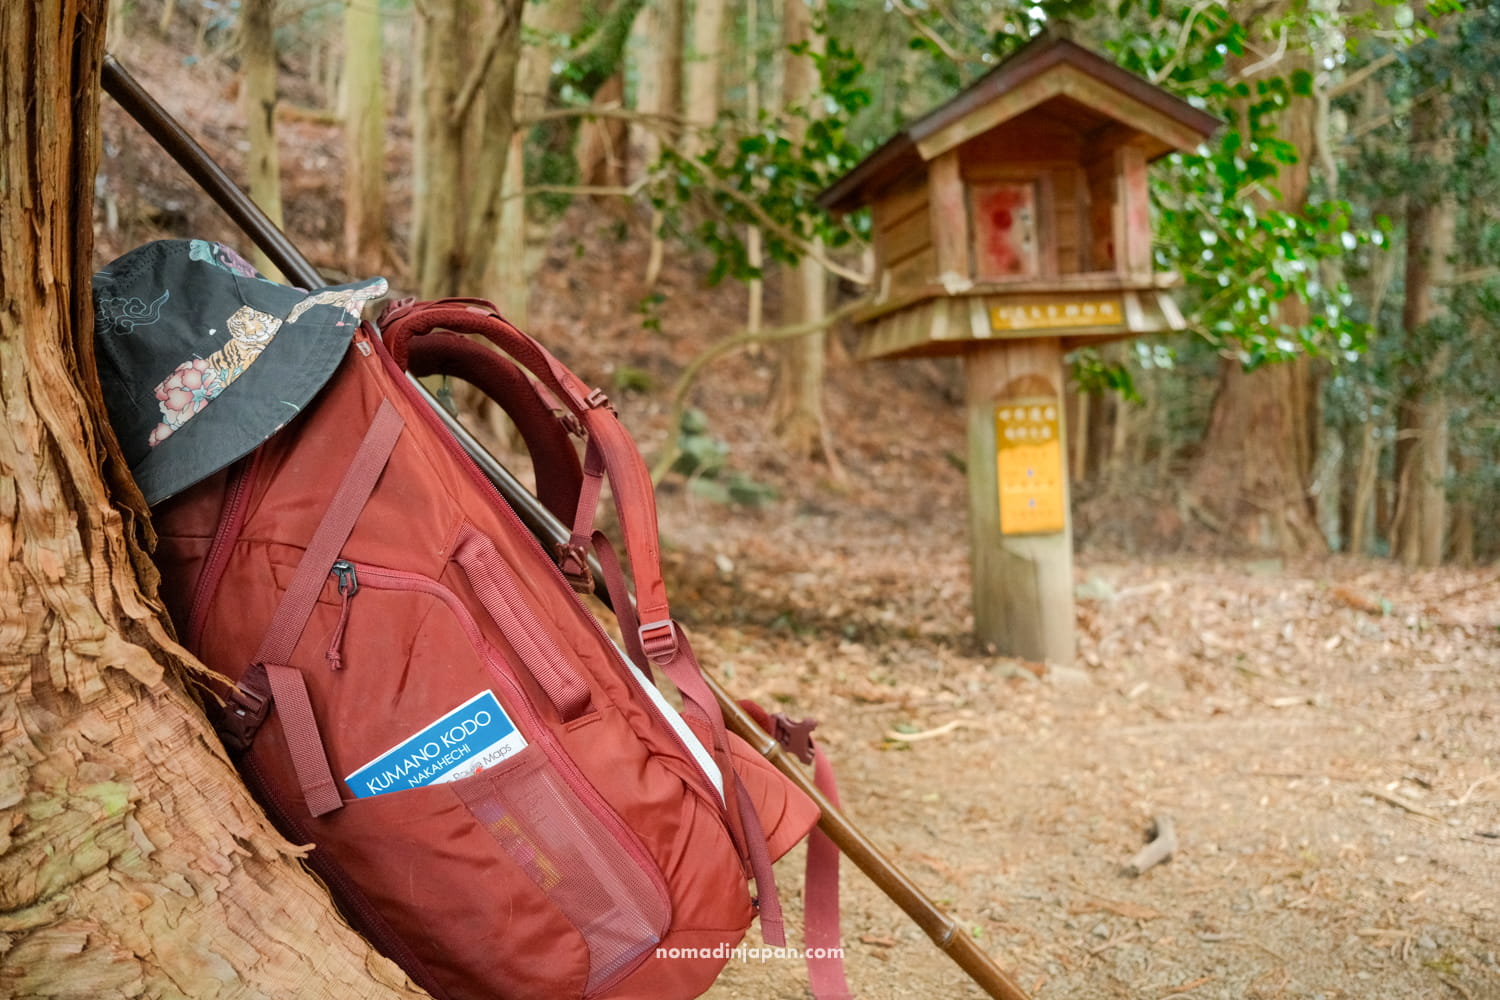
Pick up a Nakahechi Pilgrimage Route map + a Dual Pilgrim stamp booklet at the Tanabe City Kumano Tourism Bureau (free). Also available at the Nakahechi trailhead and at the Kumano Pilgrimage Center. You can also buy a Wakayama Kumano booklet (only in Japanese, for 100 JPY, NOT in Tanabe) to collect the 41 stamps along the route and get a certificate of completion.
🍱 Food on the Kumano:
Dinner, breakfast, and lunch are mostly provided by your lodging/accommodation. Most places I booked (see below for each night), included dinner and breakfast next morning. However, most lunches (bento boxes) were provided on advance request, for a fee (~1,000 JPY per person).
Those are the biggies! Now I’ll share our daily Nakahechi hiking experience and what you need to know to make your trip smoother and hassle-free.
⌚ Below, I logged all of my recorded Apple Watch stats so you can have a better estimate of real-time distances and time between each section of the Nakahechi route.
Day 1: Takijiri-oji to Takahara
- Distance: ~3.05 mi / ~4.9 km
- Hiking Time: ~2.5 hours
- Elapsed: 1:33–4:10 pm
- Difficulty: Short but steep
- Elevation gain: 969 ft / 295 m
- Stamps collected: 3

We didn’t start hiking first thing in the morning, as we had to travel from Wakayama City to Kii-Tanabe Station, where you must transfer to take the ~40-minute bus to the Nakahechi trailhead at Takijiri-oji.
Note: If you’re coming from Osaka, Kyoto, Wakayama or similar on your first day via the Ltd. Express Kuroshio train, then overnighting in Takahara is the safest choice. Otherwise, if starting early in Tanabe, you could trek from the Takijiri-oji trailhead to the next village (Chikatsuyu/Nonaka), which means a ~13+ km hike requiring 6–7 hours.
After traveling down from Wakayama, we arrived at Takijiri-oji around noon, which meant our first day on the trail was shorter than the typical route.
Instead of pushing all the way to Chikatsuyu or Nonaka area, we did a quick visit to the Kumano Kodo Kan Pilgrimage Center to grab our Dual Pilgrim stamp booklets and our bamboo hiking sticks, and hiked 2.5 hours up to Takahara, a small mountain village perched above the valley.


And honestly, it was the perfect way to begin! That evening in our mountain ryokan, Kiri-no-Sato Lodge, we had time to soak in a stone-lined onsen bath, enjoy sunset views on the mountain from our Japanese-style room, drink tea, and stroll to a cozy, fireside dinner in our yukata robes. Delicious!
If you’re planning to overnight in Takahara, I would 100% recommend staying here.
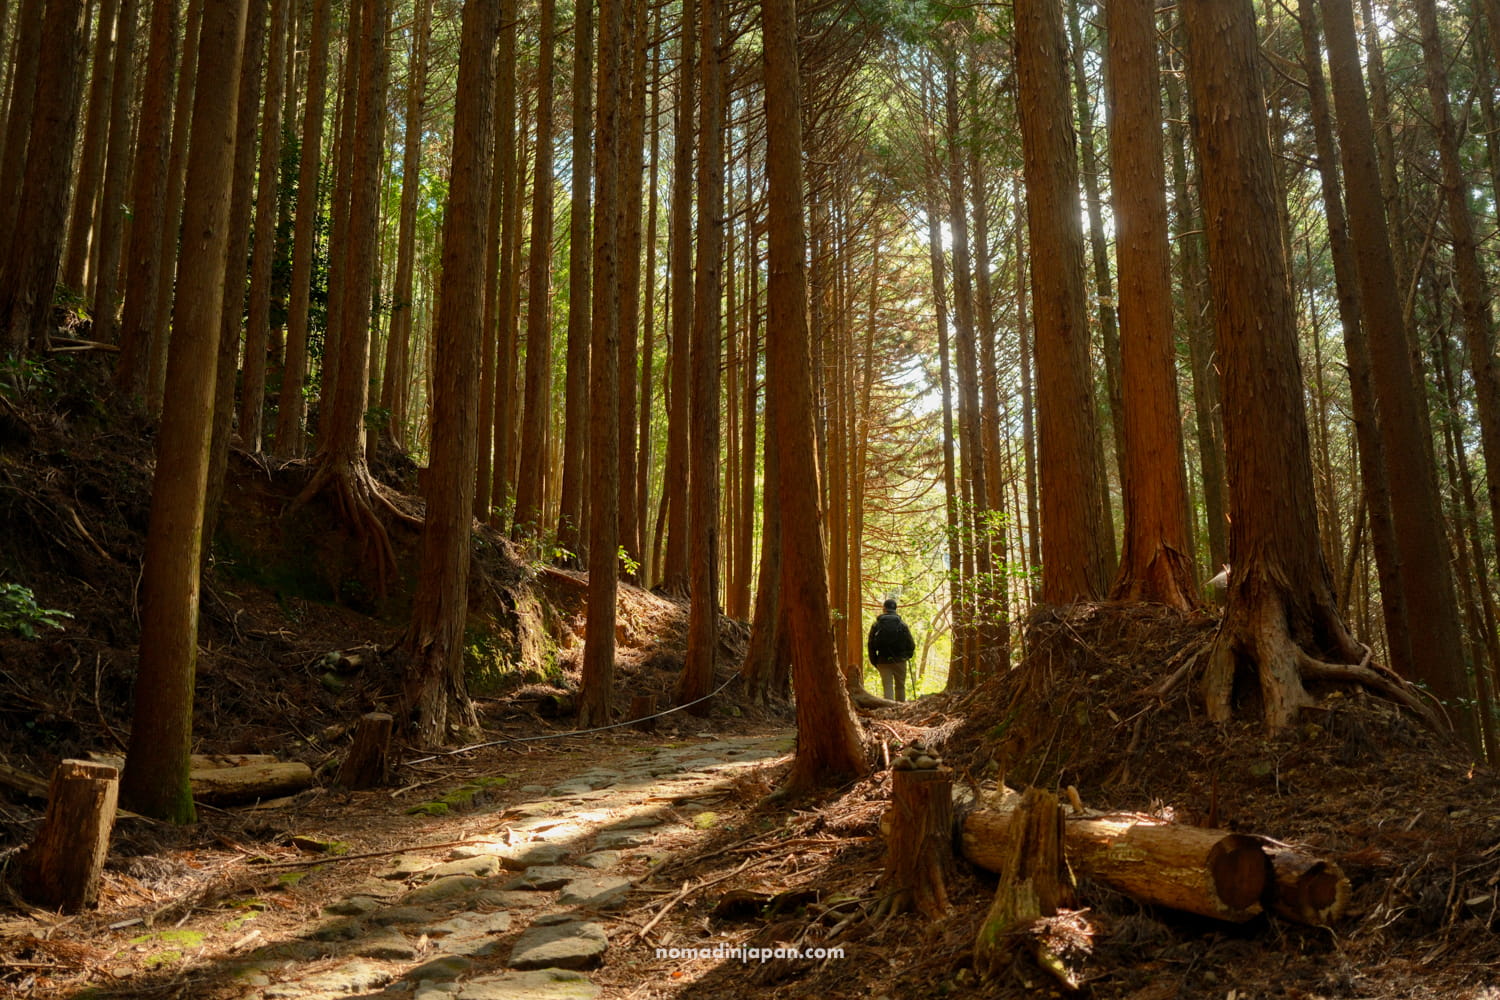
As for the difficulty of day one, even though it’s only about 3 miles, this first stretch is steeeeep. The trail starts climbing almost immediately, winding upward through the forest on a mix of stone steps, roots, and uneven terrain.
I also got very excited about collecting stamps, so I took more time that first day to read every signpost and take extra photos. 😝
If you leave Takijiri-oji around 12:30–1 pm, you’ll arrive in Takahara around 4 pm, in time to soak in the onsen and read before dinner is ready.
Day 2 – Takahara to Chikatsuyu (or Nonaka)
- Distance: ~6.50 mi / ~10.4 km
- Hiking Time: ~4 hours
- Elapsed: 9:05–2:55 pm
- Difficulty: Moderate
- Elevation gain: 1,789 ft / 545 m
- Stamps collected: 5

If you’re short on days, you can technically combine days 1 and 2 together to make a fuller first day of hiking (~14km, 6–7 hours) from Takijiri-oji to Chikatsuyu/Nonaka.
But again, I don’t regret starting this multi-day route slowly, because the following days get pretty tough back-to-back.
Following this route, however, the second day of hiking is pretty straightforward.
As you will notice, there are brown wooden Kumano Kodo signposts marked every 500 meters. (Also, lots of “NOT KUMANO KODO” signs, to keep you on the right path 😉.)
Today’s highlight is a picnic lunch at the Michi-no-Eki rest stop, which is about 30 minutes from Chikatsuyu. Vending machines, snacks, souvenirs, and udon/soba soups are available here with outdoor benches.

Trail Notes 📝
The “Three-fold moon viewing point,” is not worth climbing up for; there is no viewpoint, and you’ll waste about 20 minutes going in a circle.
You can go a bit further this day, all the way to Nonaka, if accommodation is available; however, we had to stop overnight in Chikatsuyu.
We stayed at Shino’s 1-bedroom rental, about a 7–minute walk from the town bus stop which was conveniently located in front of her café, where she’ll cook you a hot breakfast (additional fee). Our studio was fine overall, but the facilities for the price/value felt imbalanced, and the heating wasn’t sufficient for a cold winter’s night in early March.
You’ll fine more tips and suggestions on stays in my Kumano Kodo accommodation guide.
Day 3 – Chikatsuyu to Kumano Hongu Taisha
- Distance: ~12.47 mi / ~20 km
- AM – Bus to TRAILHEAD: Doyukawa-bashi bus stop
- PM – Bus from Hongu to Yunomine
- Hiking Time: ~6.5 hours
- Elapsed: 7:45–4:10 pm
- Difficulty: Moderate+
- Elevation gain: 2,500 ft / 762 m
- Stamps collected: 8

In the morning, to shorten the ~25 km hike to Kumano Hongu Taisha, we (and other hikers) took the early 07:23 AM bus from Chikatsuyu.
If you’d like to do the same (and skip about ~6–8 km of road walking, then get off at Doyukawa-bashi bus stop, cross the Log Bridge (as written on your map), and begin your climb in the forest.
(Note: From the trailhead, my Apple Watch logged 12.5 miles, or just about 20 km. However, our official map records more closely to 18 km. I expect this was due to our round-trip walk to the Oyunohara Sanctuary (O-torii gate) and back from Hongu Taisha.)
In other words, the long stretch between Chikatsuyu and the Hongu area is a toughie. Not so much in elevation, but just distance.
However, I remember this day as being one of my favorites for its gentle, flat stretches in the shady forest, running along the Otonashi-gawa River. It’s also the day with the most amounts of stamps to collect, which is fun!


Then, the grand finale approaches. First, you’ll get a view of Hongu Taisha in the far distance (at Fushiogami-oji stamp + viewpoint), then a cheeky side view trail of the O-torii gate. After a final descent into the valley, you’ll be arriving at the back entrance of the grand shrine. It feels like a maaaajor accomplishment!
💮 Don’t forget to stamp your Dual Pilgrim booklet by the reception office to “officially” complete the Kumano Kodo Nakahechi route, and pick up a keepsake omamori (amulet) of the Yatagarusu three-legged crow 🐦⬛ — the official emblem and spiritual guide of the Kumano Kodo!


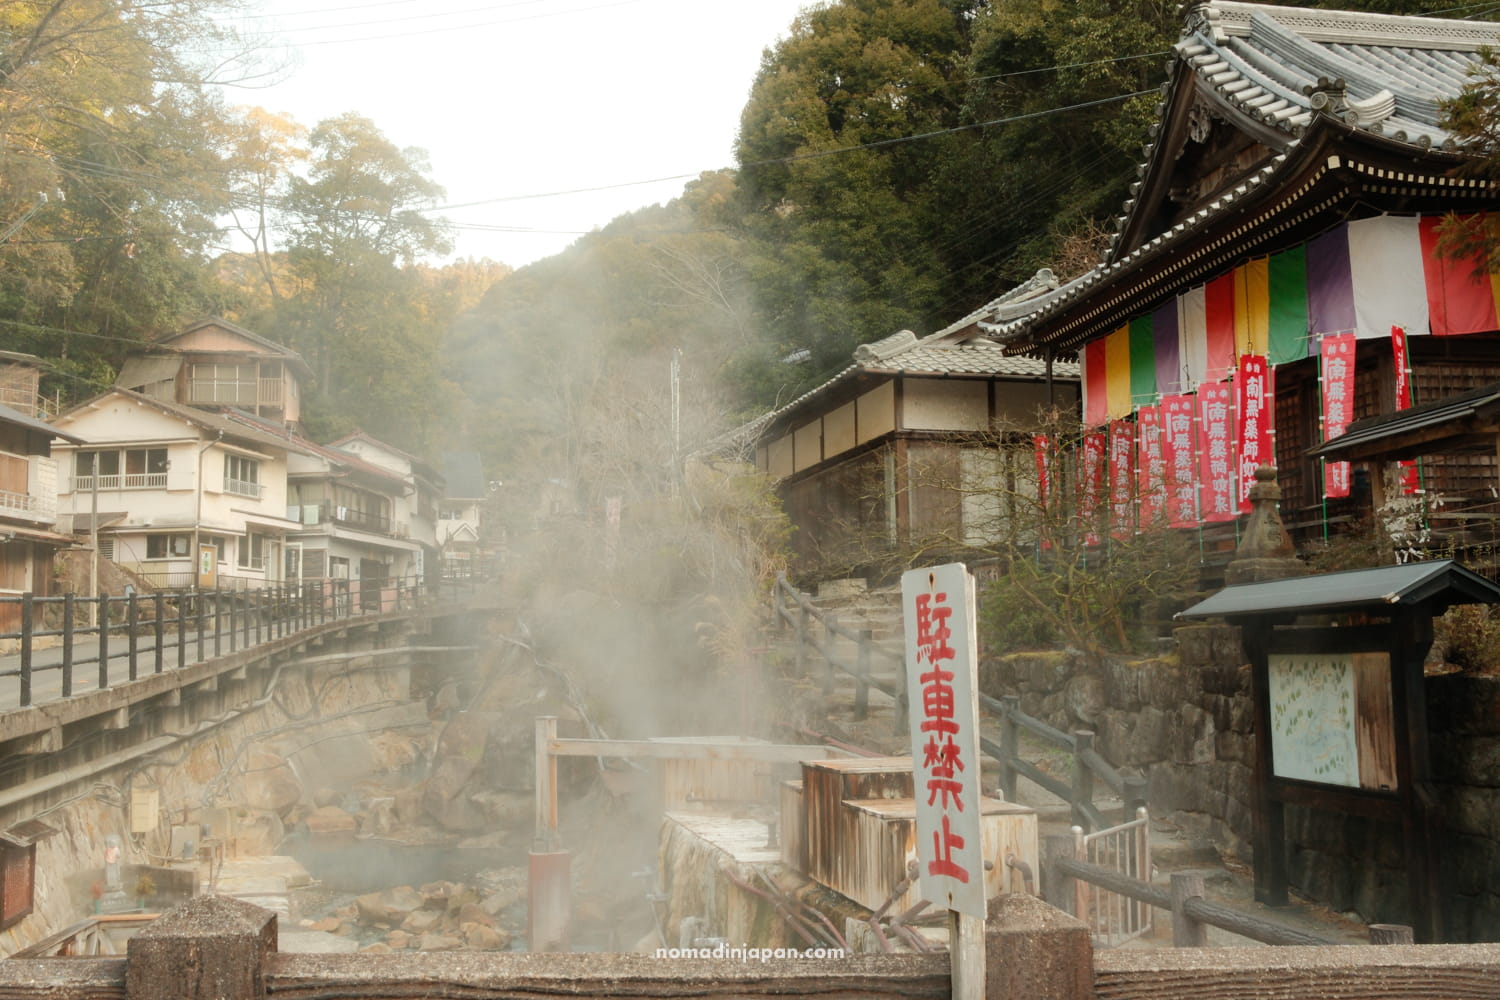
However, by dusk, my feet ACHED for a break. I couldn’t wait to get to Yunomine Onsen, where we lodged for the night at the very cool J-Hoppers Hostel.
We soaked in our hostel’s onsen baths, and again soaked in the famous Tsuboyu hot spring in the tiny shed built over the village creek early next morning, before heading off to face down the Kogumotori-goe mountain pass to Koguchi.
Day 4 – Yunomine Onsen to Koguchi
- Distance: ~9.52 mi / ~15.3 km
- Bus to TRAILHEAD: Ukegawa bus stop
- Hiking Time: ~5.5 hours
- Elapsed: 12:00–6:24 pm
- Difficulty: Moderate++ (hilly on the knees!)
- Elevation gain: 2,405 ft / 733 m
- Stamps collected: 3
From the Hongu area (including Yunomine and Kawayu Onsen), the Nakahechi route hiking trail continues from the Ukegawa trailhead. You can walk here via the road, but we decided to take the bus instead (first from Yunomine, then from Hongu, where we picked up lunch and snacks for the day).
As I mentioned, many people decide to end their Kumano Kodo Nakahechi hike after reaching the Kumano Hongu Taisha (as it officially counts as completing the pilgrimage). However, the Nakahechi continues on from the Hongu area down to the Nachi Taisha and the Nachi Falls (Japan’s tallest single-drop waterfall).
Symbolically, this felt like a must-do for us; however, there are other ways to organize your Kumano Kodo itinerary, such as taking a boat tour from the Hongu area to Shingu.
While the Kogumotori-goe pass has less distance than the previous day, the elevation gain and loss really get tiring. There are many ups and downs on this pass, and it’s a long, trending uphill to start.
The highlight was seeing the “3600 Peaks of the Kumano,” which also made the perfect lunch spot for today’s hike.

But, I must say: DON’T underestimate how long it takes to go down into Koguchi.
The final descent from the Sakura-jaya Teahouse remains (on the map) into Kowaze, then Koguchi, felt like it would never end! So, be prepared.
I’m really glad I had my trekking stick, but I still came away with very sore knees.
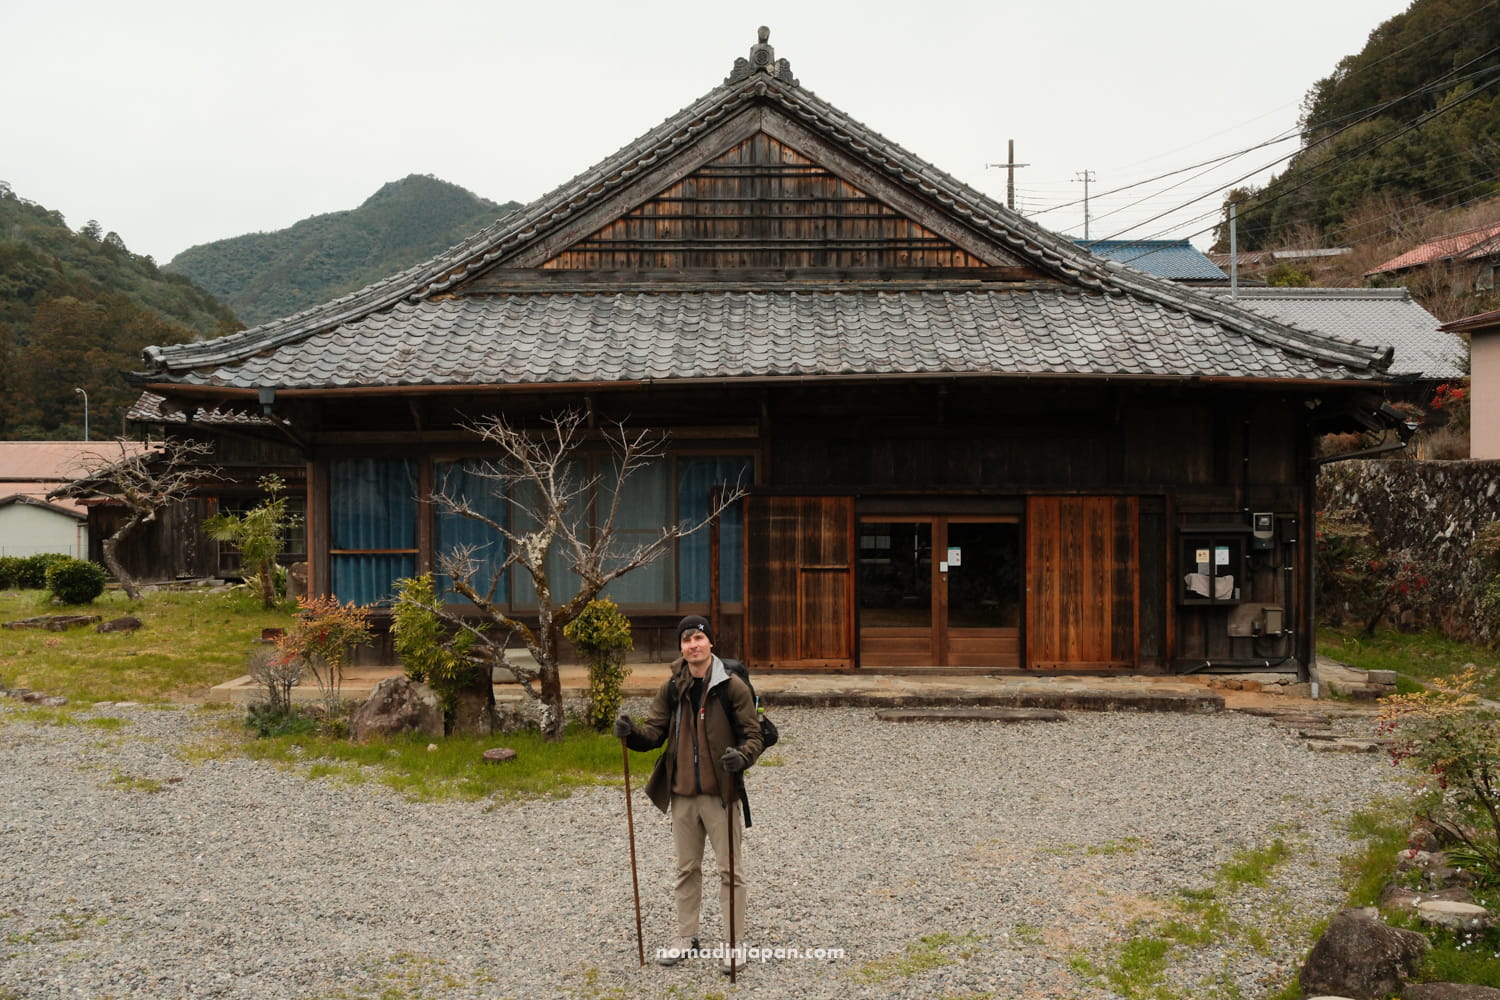
We arrived just in time for dusk, and luckily had a bento dinner waiting for us at Sen. Haven Nakamura (a 3-bedroom house). There’s nothing open in town, save for this sweet, precious woman’s grocery store where you can stock up on snacks (closes at 19:00 / 7 PM).
⚠️ There is very little accommodation available in Koguchi, and yet, it’s an imperitive stop-over because the last and final day of the Kumano Nakahechi route from Koguchi down to the Kumano Nachi Taisha is both long and brutal, and requires leaving no later than 8 AM for.
Day 5 – Koguchi to Kumano Nachi Taisha
- Distance: ~11.06 mi / ~17.8 km
- Hiking Time: ~6 hours
- Elapsed: 8:00–2:39 pm
- Difficulty: Hard 🥵
- Elevation gain: 4,134 ft / 1260 m
- Stamps collected: 5
The last hiking day of the Nakahechi route of the Kumano Kodo stretches from Koguchi village across the ever-challenging, knee-killing mountain pass infamously known as the Ogumotori-goe (Koguchi to Nachisan).
This trail is insaaaaaane. It’s an ancient stone-paved trail that climbs and climbs before it descends ever on. While we absolutely flew on the uphill climb, the downhill slowed us down. So, take your time. The elevation gain on this final day is just over ~4,000 ft with a loss of 3,051 ft.
It’s not to be underestimated. We left exactly at 8:00 AM at the Koguchi trailhead and arrived just before 3:00 PM, which gave us enough time to visit the Kumano Nachi Taisha, the Buddhist Seiganto-ji Temple (there’s a stamp here, too!) and its vermillion pagoda, and the Nachi Falls 💦 (which has its own shrine to collect a stamp from, plus massive stone stairs — beware!).
From Nachi-no-Taki-mae (closest to falls), we took the bus into Nachi-Katsuura and arrived just after sunset at our hotel for the night, Hotel Urashima — famous for its unique cave onsens (note: NOT tattoo-friendly).
The next morning, we took the Gobo Nankai bus (~35 minutes) from Kii-Katsuura Station to Shingu, where we collected our final stamp and officially closed our Kumano Kodo Pilgrimage by visiting all three Grand Shrines of Kumano: the Kumano Sanzan.
🌟 For more details on a pre- and post- Kumano Kodo itinerary, read more in my guide.
Optional Nakahechi Route Variations or Shortcuts
If you’re set on hiking the full Nakahechi route, I suggest following our day-to-day trail schedule above closely.
Otherwise, there are options to shorten it from 5 days to 3 days. For example, you can combine hiking days 1 and 2 above to skip a night in Takahara. (In retrospect, I’m glad we had this mountain lodge experience; it was a perfect “slow” start to our spiritual trek!). You could also remove the last optional night in Nachi-Katsuura and travel back to Osaka, although that would extend an already long day.
You can also skip big chunks of the trail between Nonaka and Hongu, as much of the start of the trail is along a paved road. This helps reduce miles hiked, while still qualifying for Dual Pilgrim registration.
A third alternative is to skip the 2-day hike between Hongu and Nachi Taisha and instead take a boat tour from Hongu to Shingu, then finish by bus to Nachi Taisha.
It all depends on how you’d like to experience your own Kumano pilgrimage. Will you hike the full length, and go as far as you can on foot? Or do you need to set aside a tighter budget and trip length, and bus some sections?
Reminder: There’s no “one way” to hike the Kumano Kodo! ❤️
How Difficult Is the Nakahechi Route Really?

I wasn’t expecting the Nakahechi route to be as difficult as it was (in particular, those last two days). Perhaps that’s because we chose to hike with our 40 liter, 12 kilo backpacks the entire way? Or because my knees just can’t handle what they used to! 😬
But I think beginner hikers would struggle a bit — if you’re new to hiking, don’t let that deter you, but do plan to train/prepare for this multi-day hike.
Sometimes, the brochure markets the mountain passes as “demanding day walks,” but these aren’t really day walks. If you properly hike the Nakahechi with your own gear, the sections are long, demanding, and will require a moderate level of fitness.
If you’re worried about carrying a backpack, consider luggage forwarding services and opt for only a light day pack to carry water and essentials.
Certainly, I would classify the Nakahechi route more as a multi-day hike or trek, since the terrain is quite rocky, unstable, and proper preparation is essential for avoiding slips/falls, wildlife encounters, or hiking in the dark.
Please go prepared! 🙏
Where We Stayed Along the Nakahechi Route

Below, I will summarize all the places we stayed above for easy reference. While you can reserve accommodation via the Kumano Travel website, the platform is honestly a bit confusing and unavailable at times.
While you most certainly should look into it, I also recommend doing your own due diligence and research in dividing up your Nakahechi hike into reasonable trail sections that work for YOU.
If you need to spend an extra night around Hongu/Yunomine to rest the knees, do it. If you want to start slow in Takahara, do it!
🌟 I personally put together a self-guided itinerary, and zoomed in on the map on Booking.com to find available accommodations in each village / essential section of the trail.
Here’s quick links for everywhere we booked, but please note I’ll go into further reviews, thoughts, and details in my Kumano Kodo Accommodation Guide.
- Night 1: Takahara, Kiri-no-Sato Lodge (5 stars!)
- Night 2: Chikatsuyu, Kumanoyasai Base; 1-bedroom studio
- Night 3: Yunomine Onsen village, J-Hoppers Hostel (would stay again!!)
- Night 4: Koguchi, Sen. Haven Nakamura; 3-bedroom Japanese house (very limited housing options in this town)
- Night 5: Kii-Katsuura town, overnight in Hotel Urashima with cave onsen
Note: Luggage forwarding, and food, can all be organized and reserved with your accommodations in advance.
Thoughts on the Kumano Nakahechi Route: Would I Do It Differently?

I honestly wouldn’t do much differently if I had to re-plan our Kumano trip. I’m so happy with how our hike turned out! 🥰
I think, overall, our experience of the Nakahechi across five days was the ideal balance for us to enjoy reasonable, challenging distances, soaking in onsen, collecting stamps, and putting in the effort.
We weren’t rushed most days, and had time to enjoy the culture and spiritual ties of the pilgrimage, which was really important to me.
The payoff felt much greater being able to hike all that way, and arrive at Kumano Nachi Taisha Grand Shrine feeling proud and worn out, rather than maximize shortcuts to shave off a day or two.
Next time, I’d be keen on undertaking a more difficult, longer route, such as the Iseji or the Kohechi, now that I’m familiar with the Nakahechi!
Final Tips for Hiking the Kumano Kodo Nakahechi Route

I’ll keep this simple, this is really just a final overview to remind you of the important bits.
- Start early!
- Book accommodations in advance (at least 3+ months out, if possible)
- Plan your journey; pace yourself 🌱
- Allow for flexibility in your itinerary
- Carry cash (about 20–40k JPY should do) and small coins for shrines
- Pay attention to weather changes! ⛅️
- Wear/pack layers
- Take trekking poles or a bamboo stick to ease the knees
- Be mindful of shrine and onsen etiquette
- Respect locals and the communities you pass through 💕
- Carry out all trash; Leave no trace!
- Be aware of trail conditions + local flora & fauna
- Enjoy and have fun!
If you’re deciding how many days to hike, check out my full Kumano Kodo itinerary guide for more details on activities and accomodation before and after your hike.
Have any leftover questions I didn’t answer? Drop them in the comments below and I’ll reply as soon as I can. ☺️